Quantcast
Channel: CAROLYN SAXBY MIXED MEDIA TEXTILE ART
Viewing all 173 articles
Browse latest View live

where emeralds grow

$
0
0
I've finished titivating the six mini, allotment inspired, abstract landscapes
and I thought I might share one a day over the next six days
(Saturday to Thursday)
 
this one is called "the emerald allotment"


the base consists of a stiff Vilene layered with torn papers and cut and ripped fabrics
distressed papers and hand painted papers are perfect for this technique
(use your gelli plate samples)
 
after securing the pieces (I will explain on Saturday)
more colour can be added with paints, oil pastels, gilding flakes etc.
then use your sewing machine or hand stitches to further secure the pieces
 
you do all that before cutting up your piece to make smaller pieces to work on ...

 
the emerald allotment has pieces of silk and hand dyed fancy yarns
metallic organza, a bit of old cross stitch of a bee hive
papers painted with gold acrylics, little pieces of fabric
and some "emerald" jewels ripped from an old top I had
 

I love close up photos of stitched details
 
you can see the zigzag machine stitching (variegated metallic thread)
french knots, gold stitches and beads
 
the metallic textures near the "emeralds" are gilding flakes glued on and burnished
 
really ... you can use just about anything you wish on your pieces
so long as you can secure it on with glue or stitch
this is where doing things in order is important
 
and here is it ... finished I think!
(knowing when it's finished is instinctive but very personal)
 

I've been thinking about offering a little tutorial on this abstract technique
which is suitable for beginners upwards and has endless possibilities
 
the technique is a lot of fun because you work on one abstract piece
and then cut it up into as many little pieces as you wish
 
at the end ... the pieces are suitable for framing or stitching to small canvases
or can be made into art cards or glued in your sketchbook
 
on Friday I will give a list of materials to gather
ahead of the tutorial which I hope to post next Saturday
 
tomorrow ... "the beekeeper's allotment"

the beekeeper's allotment

$
0
0
the beekeeper's allotment is naturally honey coloured
 
I used cellophane toffee wrappers, hand dyed silk and some metallic fabrics
and the other side of the beehive cross stitch with tiny little bees

 
on top of the silk I added some gold metallic paint and pressed another
piece of chiffon and some gilding flakes into the paint while it was still wet
 
I also added some of the gold paint on the blanket piece
and dotted lots of french knots across the piece
 
I used different shades of honey, beige, brown and gold for the knots
in this instance ... I think they look like little bees


I like using fabrics that have raw edges
and fabrics with pleats and tucks
 
along with the knots ... it adds a bit of texture so the piece is tactile


tomorrow ... "the allotment hedgerow"

the allotment hedgerow

$
0
0
over the top of the allotment hedgerow
you might catch a glimpse of beaded seedy things
amongst the chiffon grassy things


on top of layers of chiffon I've used fly stitches with beads
and the corner of the field is bordered with metallic lace
which is now tarnished and dark with age ... just how I like it
 
I've secured the lace with some invisible stitches in gold thread


you might also find some "sluggy" type things
 
they came about by painting and gilding on top of small pressed pleats in the fabric
I added some gold metallic beads which then made them look a bit slug like
... a bit like "Sid the Sloth" from Ice Age ;o)
so this turned into a happy piece that makes me smile


fabrics, paints, gilding flakes, a few more "emeralds"
layered fraying chiffons, running stitches, fly stitches, beads and metallic lace

this one reminds me so much of the fields and landscapes
along my  favourite coast road between St. Ives and St. Just
 
the fields stretch out to meet the sea and sky
 
 
and the cows come up to have a nose and greet you
they like to slobber on bags and cameras too, if you're not careful!
 
 
these fields and dry stone walls are further along the coast road near Geevor
it's a place I like to go blackberry picking in autumn
 
 
the horses like to get up close and personal too ...
 
 
hello ... a moo from Morvah and a neigh from Geevor ♥
 
St. Ives bay this morning ...
 
 
the skies were very stormy over Hayle and Godrevy way
but brighter over the town ...
 
 
I had a great morning with St. Ives Textiles
and afterwards enjoyed a pasty in the harbour with friend Margaret
looking out over this view
 
I call it "linen clouds"
 

 tomorrow ... "the pumpkin patch"

pumpkins and bodkins

$
0
0
down on the pumpkin patch
the pumpkins grow amongst the woolly ploughed furrows
on a bed of hand dyed silk with metallic stitched boundaries


 the machine stitching is enhanced with gold paint and gilding flakes


the beads on wire are couched down on the pumpkins fabric
and knots are stitched with "thread" torn from a chiffon scarf
 

I ripped the chiffon into "ribbons" to sew with
but I needed a bodkin with a large eye to get the chiffon thread through


sewing knots with chiffon


just a few ideas ... ahead of the tutorial on Saturday
please pop by if you would like to have a go at this very simple project


tomorrow ... landscape lines (with a message)

landscape lines and bees that like shiny

$
0
0
on this allotment there is obviously something that the bees are attracted to
perhaps it is the shiny gilding flakes
or that clump of orange woolly bush on the landscape


this is quite a close up shot of the gilding flakes on hand dyed silk
it hardly resembles silk at such close range ... but has a lovely sheen in "real life"


when layering up my base initially I used some paper from a magazine
that had a bee and a hive and these words by Albert Enstein
 
"in the middle of difficulty ... lies opportunity"


I had no preconception of how this little piece would turn out
I just added stitch and things as it felt right
 
as it turned out I like the landscape lines of stitch
with the three rows of running stitches ... matching the bee
 
I didn't plan it ... I noticed it afterwards


at the bottom I used daisy stitches in bronze metallic
to enhance the tones in the chiffons, silks and gilding flakes
 
stitches can be added to either enhance or disguise areas of work


tomorrow - a sunny corner ... the sunflower allotment
Friday ... materials for the tutorial
Saturday ... the tutorial

the sunflower allotment

$
0
0
along with the emerald allotment ... I think the sunflower allotment is probably my favourite


and what I like about this project and each of these little allotment pieces
is that you can turn them around and they still look "right" (if you know what I mean)


there is so much joy in selecting fabrics, threads and paints to use
I honestly think there is no greater pleasure ...


I've selected distressed papers, melted fabrics, bits of chiffon and metallic sheers
there is some machine stitching (nothing fancy) and some french knots which I love to stitch
 
the threads I chose were shades of sunflower


there is shimmering light from the chiffons and burnished gilding flakes


layers on layers equal interesting texture


every French knot is worth the time invested ...

the sunflower allotment is my sixth and final piece in this little series
but I enjoyed stitching these so I am sure I will make more in the months ahead and
they will feature in The Crow Show at The Arts Club from 31st October - 15th November 2015
 
tomorrow ... I will list the materials | requirements for the tutorial
Saturday ... the tutorial

textile ingredients - materials for the tutorial

$
0
0
thank you so much for following along with my little allotment series.  I'm now about to list the materials and talk about the ingredients
 
suitable for all levels
I will post a tutorial here tomorrow which will be suitable for every level from beginners and students to more experienced embroiderers and artists.  I will be sharing the basic ideas and it is up to you how far you take the technique.  If nothing else, the little textile pieces you will produce are a good platform for practicing hand stitches and exploring colour and texture.  If you choose to produce elaborately decorated pieces then you can take them further by putting a view finder on your piece and developing your work in your sketchbook
 
nothing fancy required
I will list the materials | requirements ahead of the tutorial.  I just wanted to say that it's a great technique for using up what you already have.  So raid your stash boxes, use up your old paints and when it comes to decorating your little pieces remember that anything goes ... including couching on found objects and using up left over bits from other projects ... I'm all for recycling in textiles.  You don't need very much of anything ... variety is the key when it comes to selecting fabrics and papers etc.
 
inspiration | starting point
sometimes it helps to have a colour scheme or theme in mind when gathering your materials.  If you are stuck for ideas on this ... cut out a magazine image you like or think seasonal colour ... ie. I chose autumn tones and I was also inspired by this postcard that my dear friend Colette Copeland sent to me ...
 
 
I felt drawn to these particular tones of orange, yellow and green
it was my starting point ...
 

and I was further inspired by this bowl that was on my desk
a gift from my friend Lesley Ninnes


materials you will need

a base layer - some stiff fabric on which to work on.  I used a stiff Vilene (used to stiffen shirt collars) but if you don't have any you can use stiff calico or cotton or some other stiff interfacing fabric.  You will be gluing fabrics and papers to this base layer so bear this in mind when making your selection

I chose to use this Vilene because I'd had it forever and it had started to look very yellow with age.  It's stiff enough to be an excellent base but soft and pliable enough to stitch through the layers


fabrics - a selection of fabrics such as cotton, silk, hessian, chiffons (melted or not), velvet, ribbons, pre-bought patchwork fabrics, lace, hand dyed or eco dyed fabrics, small snippets of fabric that might be too small for other projects, cellophane sweet wrappers, man made fabrics such as nylon and lining fabrics, woollen blanket pieces, man made or hand made felt, etc.  Fabrics with pleats, tucks, folds and ripped fabrics with raw edges are particularly lovely.  Vintage images transferred to fabric (or paper) would be ideal.  You can also consider cutting up old projects, old cross stitch bits or old work in progress pieces that you know you just aren't going to get around to finishing off.  The only fabrics that might not be suitable are ones that you would find difficult to sew through either by hand or sewing machine.  These are just ideas ... you don't need it all!


papers - ripped and torn are best (but cut with scissors if you wish) - papers from magazines, hand painted papers, postage stamps, hand made papers, silk paper, craft papers, printed and stamped papers, torn envelopes, vintage letters, paper bags, images cut from plastic bags and packaging, cellophane sweet wrappers etc. ... anything goes


tools - scissors for fabric, scissors for paper, glue sticks, needles, threads, paints, optional glue gun for gluing on bits after machine stitching.  A sewing machine is handy but not essential ... if you don't have one you can hand stitch your pieces

paints - acrylics are probably best but you could use dyes or inks if you are used to using them.  Don't use anything too watery or you may not be able to control the colour run on the fabrics (unless you want colour runs, of course).  I used acrylics ... I have quite a range of acrylics from very cheap ones from the pound shop to more expensive ones that I like to use - it's personal choice.  I do sometimes dip my brush in water to help spread the acrylics on fabric ... but I don't water down my paint.  You can use what you already have

gilding flakes (optional) - I applied gilding flakes to the paint when wet, you can also apply the gilding flakes with glue stick or pva.  You will need to let the paint or glue dry, then carefully cover over the flakes with a thin piece of paper and then burnish the gild to a finish that pleases you.  I use Clarity Stamp gilding flakes and for this project I used "variegated green".  In the UK you can buy gilding flakes from Crafty Notions and other very good suppliers (I am sure)

threads - a variety of threads (but you don't need much) ... cotton embroidery threads, wool and woollen yarns, string (optional), metallic threads, variegated threads (threads that change colour), hand dyed or hand painted threads, one strand sewing machine thread, sari silk ribbon or make your own "thread" by tearing up a chiffon scarf or other fabric (you will just need a needle with a bigger eye), etc. any threads ... anything goes


bits to decorate with (optional - it's up to you) - beads, sequins, buttons, charms, jewels cut from clothing, other sewing accessories such as poppers, hooks and eyes, found objects that can be couched on (over sewing to secure), shells, feathers, twigs, gilding flakes (see above), etc. be adventurous ... either glue it on with a glue gun, sew it on if it has natural holes or over sew (couch) if it doesn't

I think I've covered everything ... but if you have any questions leave a message in the comments box and I will either reply to you in the comments box or send you an email

tomorrow ... the tutorial

textiles - free fabric collage tutorial

$
0
0
the tutorial
 
introduction - in the last post I listed the basics that you will need to have a go at my little fabric collage project - please know that you don't need all of the fabrics.  For example, some of the things I listed were prompts/ideas for using up old pieces of work ... it's exciting to use up old projects and clear the decks a bit ..... so here we go!
 
inspiration - you may have given some thought to your theme or colour scheme ... if not it really doesn't matter.  This is a very freeing and very personal project ... you can copy my colours if you wish but better still if you have your own project in mind.  If you have no particular project in mind then using a variety of colours with no particular theme means you may end up with some very lovely abstract pieces, which is exciting!
 
prepare your base layer - get your piece of stiff Vilene or stiff calico or cotton and cut your piece into approximately 9 inches x 12 inches.  It really doesn't matter at all if you go an inch smaller or bigger either way
 
 
STAGE 1 - COVER YOUR BASE LAYER WITH FABRICS AND PAPER
 
layering - from your pile of gathered fabrics and paper  ... tear, rip or cut pieces of fabric and paper and glue it straight down on the base layer ... work in an abstract manner and work quickly without thinking too much about placement.  Don't be too fussy at this stage and you will get some good results


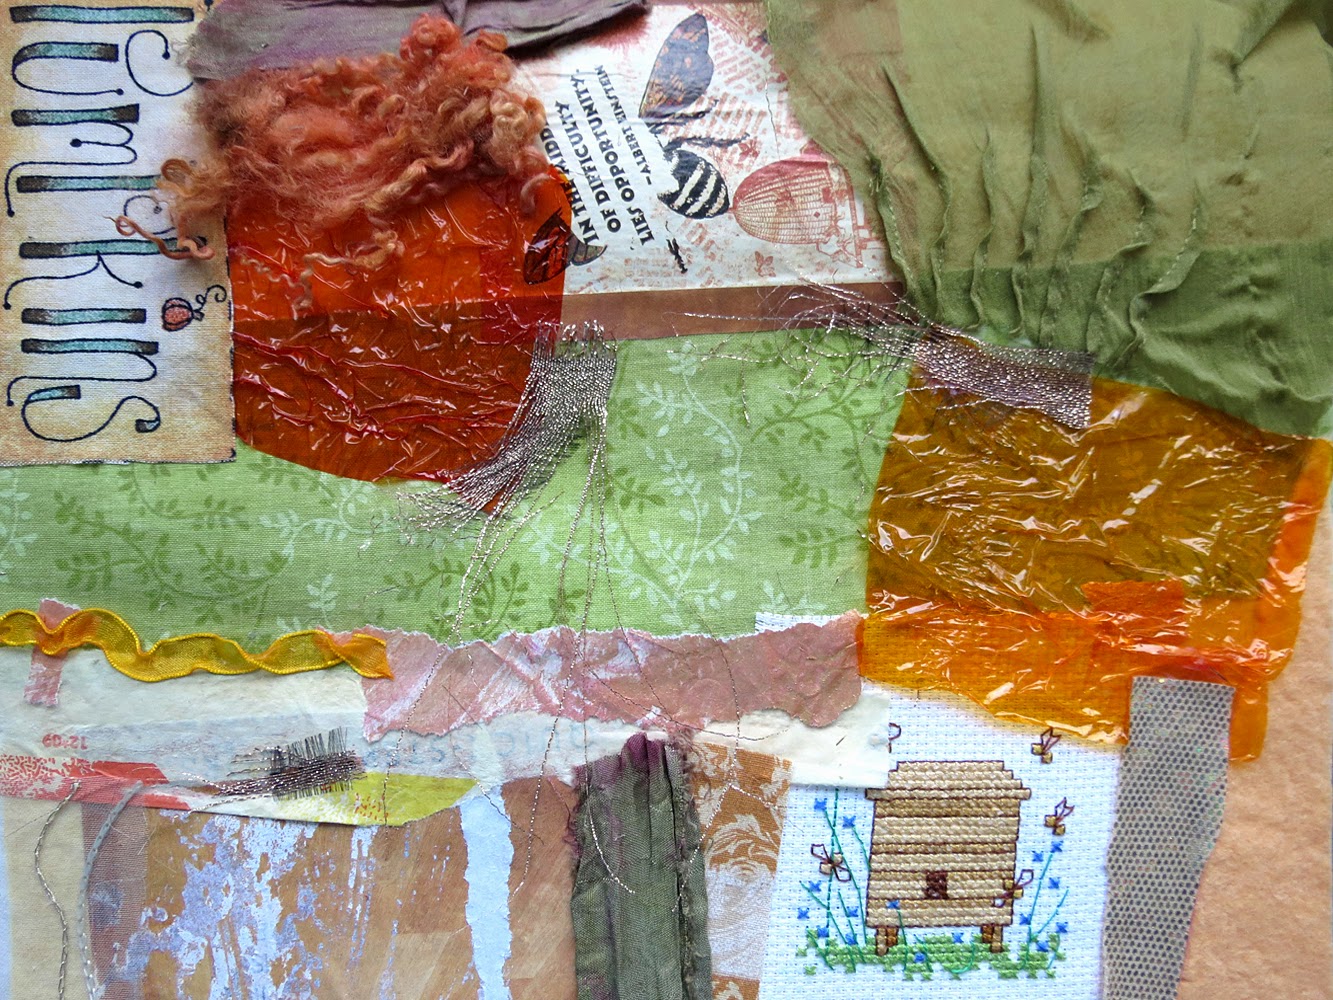
here I have glued some paper and some chiffon with stitched pleats
some wool tops and some cellophane wrapper
as well as very small bits of metallic fabric with fraying edges
 
 
glues - I use a glue stick ... but you can also use pva glue if you wish.  Glue stick dries quite quickly.  Whatever you use, you will need to leave your base layer to dry out thoroughly before moving on to the next stage.  If you have a hair dryer you can use that on a medium/gentle setting to help it dry a bit quicker ... but I would not recommend using a heat gun as the heat will be too intense and may burn some of your fabrics and papers
 
 
working fairly quickly, glue all your pieces on ... overlapping if you wish
until your base laver is covered completely
 
like this ...
 
 
above you can see some of what I've used - the green fern and the pumpkin fabrics are shop bought, there is a piece of old cross stitch, two cellophane wrappers in orange and yellow, assorted torn papers from paper bags and distressed magazine papers, the bee and hive image were torn from a magazine, there is also some hand dyed sari silk ribbon and some little torn metallic sheer fabrics dotted over the piece
 
before moving on to stage 2 - please ensure your work has dried out sufficiently (see above)
 
STAGE 2 - APPLY PAINT TO YOUR PAPERS AND FABRICS
 
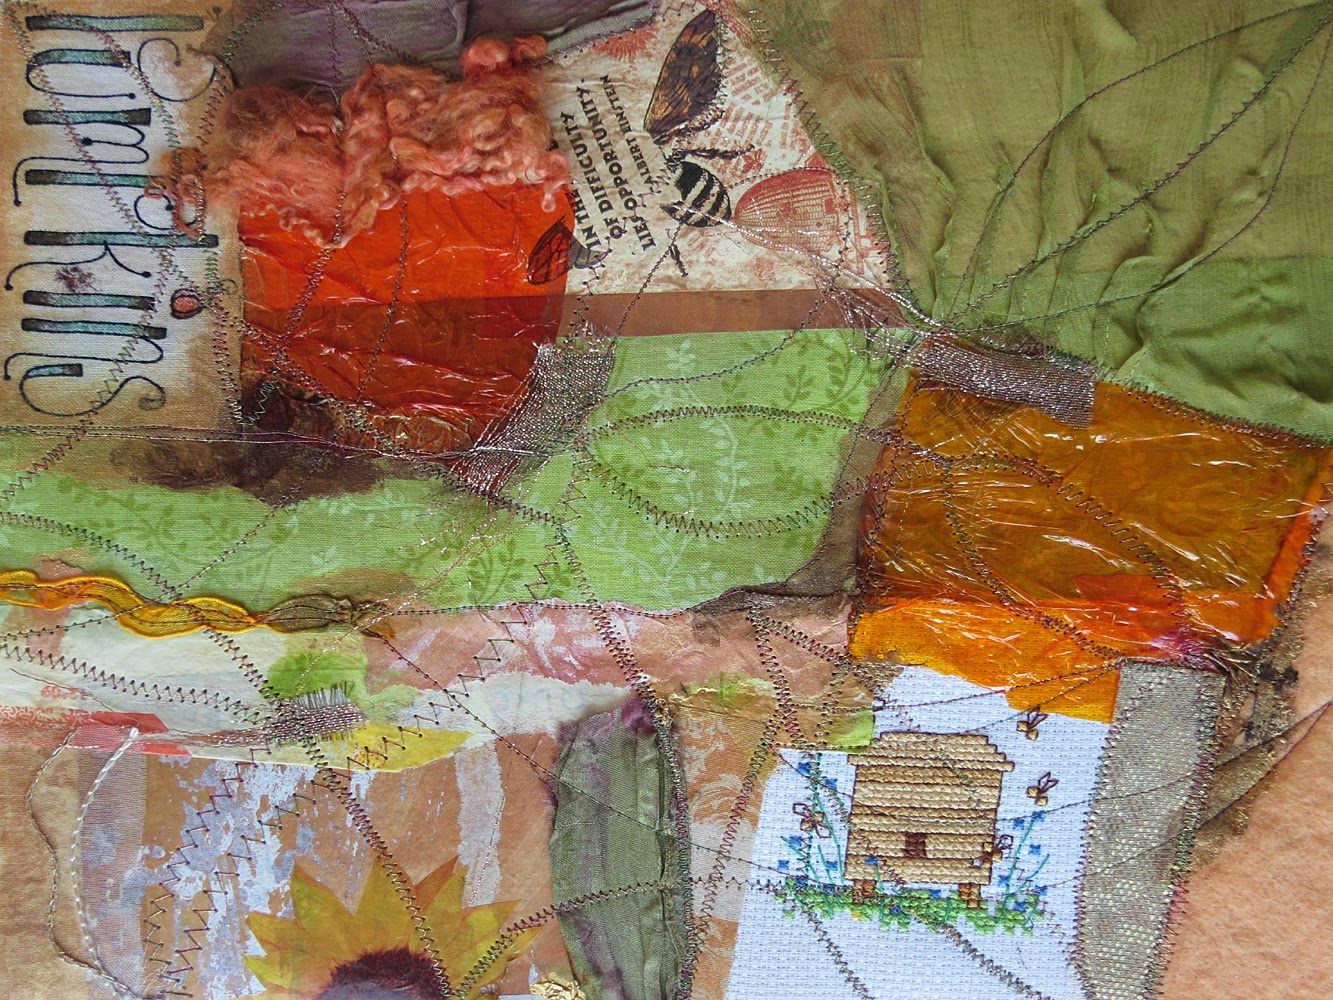
blending - using your paints/acrylics or other colouring medium ... use them to blend the fabrics and papers together.  There are no rules ... it's up to you.  You can use your paints or colouring mediums to either enhance and draw attention to areas you love or to disguise areas you don't like so much.  If you don't like what you've done with the paint ... wipe it off, let it dry and paint over with another colour or glue a piece of fabric or paper over the top.  You can see in the photo below I've added some burnt umber, gold and sap green ... blending all the colours together.  Then let your piece dry completely before the next stage
 
 
in the picture below I've worked burnt umber and gold paint into a piece of wool blanket
and it's optional but, if you wish, you can press your gilding flakes into the paint
 
 
before moving on to stage 3 - please ensure your work has dried out sufficiently (see above)
 
STAGE 3 - ADD MACHINE OR HAND STITCHING AND THEN CUT UP
 
stitching - after the paint has dried you can further secure your fabrics and papers by stitching through the layers.  If you have a sewing machine you can use free motion stitch if you are happy with the technique.  If you prefer to do simple stitched lines, running stitch or zigzag then that's fine.  Perhaps alter the size of your stitches by adjusting the length and width while you are stitching ... that can add a bit of interest.  If you are not happy using a sewing machine (or don't have access to one) you can hand stitch through the layers ... long lines right across your piece in every direction ...
 
I've used a simple running stitch and zigzag stitch below ...
 

 then turn your piece over (mine looked like this on the back) ...


 on the back divide your piece into six smaller pieces by drawing lines with a pencil
(divide into as many pieces as you wish ... any size ... it's up to you)
 then be brave and cut them up with scissors


STAGE 4 - WORK ON SMALLER PIECES - ADD TEXTURE

add texture - your pieces should now be a bit more abstract and have some interesting lines and areas of colour.  The next thing is to select just one of your small pieces to work on. 

work on your small pieces one at a time personalising them and adding texture and interest.  You can add texture by building up more layers of fabric and paint (in the same manner I mentioned above).

further texture can be added with 3D elements such as the "emeralds" I've added below.  Position your bits and pieces on your little piece, then glue down to keep them in place, then over sew to further secure.  I would add my 3D elements first before doing a lot of hand stitching.  I tend to hand stitch or sew on small beads as the final stage ... but, of course, it is up to you


I added the chiffon and emerald strip
which I glued down to "place" it, then stitched it to secure
afterwards, I worked some french knots around the piece
to help blend it in with the surrounding fabrics and papers
 

at any time, you can also apply more paint if you wish and remember those gilding flakes, if you have some.  Press your little shimmery flakes into the paint and leave to dry thoroughly.  Cover the gilding flakes with a piece of plain paper and carefully press and smooth the flakes to burnish them into the paint.  Gilding over pleats, lumps and bumps ... even little stitches ... will enhance the raised areas.  If you don't have gilding flakes ... you could gently rub some treasure gold (or similar),  metallic paint, markel sticks or metallic oil pastels over any raised areas you wish to enhance and draw attention to
 
 
(if you want to go the whole hog ... there are a variety of products out there for adding texture to your piece ... by adding texture to paint as well as texture pastes and 3D paints that you puff up with heat products ... this tutorial does not explore all those possibilities ... but if you are familiar with them ... they are suitable options for adding texture to your pieces.  It's just not possible to explore everything in one tutorial within a blog post)
 

gilding on pleats to enhance raised areas
 
 
hand stitching - when it comes to adding little stitches to your piece ... it's nice to use a variety of different types of thread, use a variety of thicknesses and a variety of colours or toning colours.  Stitch your biggest stitches, with your thickest yarns, first ... then fill in around with smaller stitches and blend your colours.  I, personally, like tones of similar colour all blended together ... but you don't have to do what I do.  Do what pleases you!
 
 
different stitches - you can use your small pieces to practice new stitches.  I'm a terror for always using my favourite french knots ... so next time I do this technique (which will be on Wednesday as I have a Crow Day) I promise to use new stitches.  I recommend any of Jan Beaney's and Jean Littlejohn's books for stitch inspiration and I also have Mary Thomas's Dictionary of Embroidery Stitches which is useful.  Online ... you can visit Sharon B's dictionary of stitches for hand embroidery and needlework for beautiful stitch ideas.  Be creative and use the stitches out of context to add texture and interest.  In addition, you could consider stumpwork or raised embroidery.  The possibilities are endless ...
 
 
stitching through painted areas
after working on all six of my little pieces I found that each one took on a new personality
they spoke to me and let me know which type of "allotment" they would be ...
... like a story unfolding
 
and I hope that yours will too
I hope you have fun with the basic ideas contained in this tutorial
work into each one as much as you wish ... until you are happy with your little pieces
it is up to you
 
 you can refer back to my last seven or eight posts for more detail
thank you for reading today and for following along
the tutorial will stay on my blog forever ... so don't feel under pressure
have fun!!  ♥
 
 
Posted by Carolyn Saxby

art challenge day 1 - St. Ives and it's many moods

$
0
0
I've very kindly been invited by five other artists on facebook and twitter
to take part in the art challenge that is going around at the moment
 
 
I am supposed to share old work for five days and nominate other artists to take the challenge.  As, I believe, the art challenge began while I was taking my break ... I have no idea who has already taken part in the challenge already ... so I'm going to say if you would like to take part feel free to share your old work on facebook.  I will be sharing mine on my facebook page if you would like to follow along
 
last evening the idea came to me to share some old work in the form of a mosaic
so here we are ... and all images are my own
 
this one is inspired by the many aspects of St. Ives that I love

 
also sharing today a couple of little mixed media collages
 
a melancholy for sand dunes and dreaming of childhood holidays
 

and this one is inspired by the lighthouse on Smeaton's pier, St. Ives

 
have a very happy Monday ♥

art challenge day 2 - wintery ones feathers and seawashed pottery

$
0
0

art challenge day 3 - textiles in seaside colours

art challenge day 4 - St. Ives in my sketchbook

art challenge day 5 - a squabble of seagulls on a rainy Friday

$
0
0

studio inspirations

$
0
0
last week was a very good week ...
 
my decorating got finished ... hall stairs landing and a bedroom
I finished up the five day art challenge
I got my wreck this journal pages done
I got my tag Tuesday tags done - here and here
 
on Wednesday I had a Crow Day with friend Jo
to make plans and work through ideas for The Crow Show
and I began some more mini landscapes ...
 
 
I'm very excited about these colours and textures ...
 
 
and I quite surprised myself by introducing pinks and purples
as I wasn't planning to ....
 
 
I love them already ... even before I've begun to stitch them
 
 
the shimmer of the silk with the added gild and metallic paints
 
what rich little landscapes they will be when they grow up
 
 
I have the beginnings of twelve new mini landscapes in all
and as promised in my tutorial I am going to use them to practice new stitches
I will begin to show them soon ...
 
also last week I "fished out" my shells and pottery pieces and began work on new hearts
I haven't made any in quite a while
 
 
it was exciting to dig out my seaside fabrics and dream of stitching beach scenes
frothy sea foam, sand and sea ...
 
 
to handle the shells ... and dream of spring rock pools
 
 
also last week I had an art day working in my Dionne Swift sketchbook
with friend Margaret (St. Ives Textiles)
 
 
we both took Dionne's sketchbook workshop a couple of years ago
but it's a project that never gets finished as one thing always inspires another
 
here we are working on drawing exercises
continuous drawing without taking the pencil off the paper
drawing with the left hand and drawing with the intent of cutting negative spaces
 

exercises designed to free up the idea of drawing
concentrating instead on lines, marks and shapes
 
 
mainly ... letting go ... being free ... having fun
 
 
yesterday ... I enjoyed being inspired by little collections
little things I've gathered in my new studio room ... which I am loving so much


I'm looking forward to spring more than ever this year ...


these little collections bring me so much pleasure


I love a little bit of the seaside on my windowsill


and things found in nature
especially seeds and pods for St. Ives Textiles
 
 
this is a snippet from my current mood board on my studio wall
 
I'm loving soft tones of spring yellow, seaside blues with winter greys
that in between the seasons feeling
 
 
and always inspiration from St. Ives

 
more gatherings in my studio ready for the week ahead
 
these materials will be used to make my art tag
(with the theme of "text" for Tag Tuesday)
 
 
I've enjoyed sharing a glimpse into my little studio world
 
this coming week will be a good one too
there is a meeting of St. Ives Textiles tomorrow morning
and my mum is staying with me for two weeks
so we will get out and about ... weather permitting
 
any spare time I get I will practice my stitches on the little landscapes
and share soon
 
thank you always for reading ♥

waiting for tiny stitches and marks

$
0
0
almost two weeks have passed since my last post
 
it's been rather busy on all fronts with work progressing in my new home
a new en suite bathroom is underway but not without an incredible amount of mess
and at the same time I've had family staying with me for the past two weeks
 
misty in Mousehole
 
we've managed to get out and about a little ... not helped by the weather at this time of year
some days misty and other days bright and sunny (but very cold with sleet and hailstones)
and most days ... grey and big blobs rainy
 
nevertheless ... I find myself grabbing the camera most days
because even when it's grey and misty ... it provides a great
neutral background offering lots of potential for creative photography
 
I really hope to become a better photographer with time and love to practice new techniques
so I've just bought "a master class in digital photography"
so that I can work through the step by step processes
and play with some of the things you can do to a photograph
 
I will dabble throughout this year ... but really it's going to be my pet project for 2016

turnstones on St. Ives pier

yesterday I spent the morning "pottering" in St. Ives with my mum
she was very patient while I took hundreds of photos for creative play
 
for me, photography is a really quick way of capturing inspiration for my textile work
plus the images give me a lot of pleasure to create
 
on one of the piers in St. Ives (the lifeboat pier) the turnstones were fun to watch
I think, perhaps, these are babies as their plumage was very soft and fluffy


above is an old postcard of The Sloop Inn on the harbour in St. Ives
which I photographed from a different angle with red fabrics reflecting on the image

the original image was mainly white with ochre and umber tints
but I think the touches of red lift it and shift the focus

I enjoyed playing with the image (which sits on my mood board in my studio)
and this is the same again ... but with a "cine" landscape frame and sepia tones with the red
 
I wonder if these boys went on to be fishermen when they grew up ...


back to textiles ... and here sharing some more little landscapes in progress
it's nice to work with warm tones ... which will turn into fruit plots and allotment pieces


there is quite a little pile of them now ... waiting for tiny stitches and marks
I haven't forgotten that I promised to practice new stitches
and once family have gone home I will get more time to concentrate on them


I did think that the placement of fabrics on this one looked a little like an allotment shed
with a sweep of green silk field


also quite liking the bias and frayed edges on the silk
the rich blend of colours ... "late summer ... into autumn"
the ideas are coming through ...

soft pink berries in my garden
I photographed these berries in my Cornish garden
a garden that is new to me and one that I am just getting to know
they are like pale pink snowberries ... does anyone recognise them?
 
the colours in my piece below are similar
I'm obviously drawn to the warm pink gold tones at the moment


 the bases of these small landscape pieces were put together on my last Crow Day with Jo
and, actually, I am looking forward to some peaceful stitching time

the metallic fibres were ironed and bonded into a fabric on which I have added
metallic paint and gild alongside painted papers and silk snippets
 

so pretty and shimmery
 
there hasn't been a lot of time for anything much the past couple of weeks
any spare time I had was used to organise samples into sketchbooks
but I did quickly get a largish piece of silk (ponge) space dyed
 
this piece started out as an eco dyeing experiment but it went horribly wrong
I caught my silk on the pan and burnt three small holes through the silk layers
 
as I had no preconceptions of how the experiment would evolve I wasn't put off ...

 
I just threw the silk between two jars of dye that were already on my worktop
the colours were green in one jar and rose madder and gold in the other
and I painted on some gold on top


the "interesting" marks on the pan are where my tulip dye boiled away :o(
(I was multi tasking at the time!)


the colours are rather lovely in real life and I hope to use
the pieces of silk in more landscapes, hearts and small pieces for cards

 
this looks just like a pond or rock pool full of coloured seaweed
so perhaps a few pieces of silk may find their way into a beach inspired heart too
 
I left the silk piece in the dyes for 4 days
and yesterday I added some pink mauve to the rose pink end of the silk
it's come out beautifully ...
 
and already my head is swimming with delightful stitchy thoughts


I'll be back soon with a few photos of St. Ives and a seaside post
thank you for reading my textile rambles
have a good weekend everyone ♥

moon gazing

$
0
0
last night ...
I watched the big big moon in a soft pink sky


I watched the pink deepen to a hazy dusk

 
I saw ...


craters and stars on the moon's surface


I stayed a bit longer and watched the sky grow dark around the moon
and a wisp of a cloud passed by ...


a soft pink glow settled around the moon
reflections of the setting sun
 
still daylight somewhere on our small planet


the moon glow shimmering across the sea


goodnight beautiful moon

tangles

$
0
0
hello and thanks for visiting
I hope your Saturday is going well!
 

since I last posted I had a great meeting at St. Ives Textiles
where I continued on with this textured and hand stitched piece ...


I'm really enjoying working on several things at the same time
 
I don't find it hard to work this way ...
just rather frustrating that I don't have even more time to stitch and paint
but I'm sure you feel the same way about that too!
 
 
my little piece features seed heads and french knots for the theme of seeds for St. Ives Textiles
but the colours were inspired by this lichen on granite at the bottom of my garden by the gate
 
my camera bounced the light and the granite looks blue ... I love this effect


as you probably know ... alongside the colours of the ocean and seaside
I love the colours and tones of the lichen in Cornwall
 
st. michaels mount - colour study
on granite, rocks and cottage rooftops
Mousehole cottages
 this tone of yellow pops up in various areas of my work
the one below is inspired by the gorse and hedgerows of the Penwith landscape
in particular ... along the coast road between St. Ives, Zennor and Morvah
 
 
as well as sketchbooks and work for the shows etc.
I've also got a big pile of seascapes and beach hearts coming along
each one is unique and inspired by the Cornish weather, seasons and moods
 
 
and below ... is a mini landscape "on the go" from my newest allotment series
couching and french knots on painted paper and chiffon
 
adding texture with stitches
 
my desk is covered in piles of stuff that I'm slowly sorting through
a mix of new and older work
 
the older work is being processed into manageable smaller sketchbooks
which I hope to share at the show in November
it's interesting to revisit older work
 
monoprints and mosaics
 in February I took part in Lawendula's paper swap
 
I was partnered with Heather Harker
(a lovely new artist friend from Lincolnshire)
who sent me a beautiful and eclectic mix of hand painted and gathered papers
as well as some vintage linen and stonewashed denim pieces
 
the denim pieces were inspiring as they had already been cut
by Heather into interesting shapes and snippets ready for use in my work
 
 
I divided the swap papers into themes
and these I'm calling "force of nature"
(others I will share in another post)


still pushing on with my creative photography
I've been experimenting more recently with soft focus
and my own painterly effect textures that I created
 
here are a few I took in Mousehole ...
 
 
the skies in Cornwall are so clean, clear and bright
I'm drawn to looking skyward, to gaze at the moon and stars at night
and morning sunrises over the bay
 
St. Clement's Isle sunrise on linen

 
on rougher days the huge waves wash over Mousehole pier
a force of nature indeed
 
 
at some point this year (soon) or next year ...
I would like to develop the technique of long exposure
there are ways of doing that with a bridge camera ... but not easy ... I suspect
 
long exposure photography gives a dreamy softness
an obscuring, blurring softness to moving elements such as water and lighting
it's a whole new project to savour next year (when I take the master class)
 
(a couple of mixed media landscape collages)
 
 
getting dusky ... lovely colours in Mounts Bay and over Mousehole
the late afternoon sun colouring the clouds and then reflecting in the harbour water
 
 
almost dark ... over Mousehole harbour
 

 back to textiles and I'm going to spend the rest of the afternoon
turning this tangle into a seaside art tag
and stick more samples and things in my sketchbook


"tangles" describes very well the chaos of my mind at the moment

I'm currently working in six different themed sketchbooks at once
 and there's lots of work to get through this year for two shows in St. Ives
 
ideas for the textiles shows, general thoughts and ramblings ...
piles of inspiration, work in progress and snippets all around me ...
I'm trying hard to keep my thought process as focused as can be
 
 
still to come ...
 
I've been spending a lot of time in St. Ives so lots of photos still to share
including a tour of the working fishermens' cellars at Porthmeor Studios
and the art installation by maritime artist Mark Dion


hope you enjoyed the photos
have a beautiful and peaceful weekend
with love from Cornwall ♥

over the wall

$
0
0
just popping by to wish everyone a very lovely weekend
 
I've had a week with friends pottering in St. Ives and Mousehole
so my anticipated Saturday post will most probably pop along on Monday now
 
have fun whatever you are doing this weekend ♥

that view ... and nodding pods!

$
0
0
 the green lichen on the wall caught my eye
and so did that patch of green countryside on the far coast
looking across St. Ives bay towards Hayle and Godrevy (a favourite spot)
 
the fields shimmered in early springtime sunshine
and the seed pods (softly out of focus) in the foreground
nod knowingly that spring proper is just around the corner ...
 
let's hope it is ...

days at the seaside

$
0
0
a bit of a seaside post today
sharing some recent photos ...
 
 
in St. Ives with my mum at the end of February
 
quite a warm morning for February
the sun made everything even more beautiful ... if that's possible
the sea was calm and very green, light reflecting off the sand
we watched the seagulls coming in to land
they were quite bothersome that day ... there was much pasty stealing!
I was down in St. Ives again at the beginning of March for St. Ives Textiles
at Porthmeor Studios
 
a view of the island from Porthmeor Studios
 we were given a tour of the fishermen's cellars
at Porthmeor Studios, Back Road West
 
it was a rare opportunity to take lots of photos for St. Ives Textiles
and I will be updating the website very soon
with new work and inspiring photos from the cellars
you can sign up here to receive updates if you are interested ...


with thanks to Marilyn Weston for arranging the tour
 
it was fascinating to meet one of the last remaining net menders in Cornwall
and learn some of the history of the cellars, still in use
also to see the maritime art installation created by Mark Dion
 
even the walls tell a painterly story or two ...


vintage art materials in Mark Dion's maritime art installation

 
 the fishermen's cellars ...
 
 
 also at Porthmeor Studios ... admiring the Gyotaku prints
prints made using real fish, squid and squid ink
something I want to have a go at myself!
https://www.facebook.com/PorthmeorStudios
you can see more fishy prints on the facebook page of Porthmeor Studios here
 
back in Mousehole ...
 
Mousehole harbour
and all last week we had friends staying with us
it was nice to have company on my walks and beachcombing
 

 I took these photos of the "baulks" in Mousehole harbour

during the winter months the baulks are positioned by crane
 to bridge the gap between the two piers
offering shelter for the harbour from winter storms and the like
 
I would really love to make a largish quilted piece some time
inspired by the colours lines numbers and rings in these photos 


I'm glad I managed to get these photos as it's ...
 
"baulks up, boats down" on March 21st
that means the "baulks" will be lifted by crane so that the Mousehole "gap"
(between the two piers) will be open again for boats to go in and out


friend Sue was very patient ... I took rather a lot of photos as usual
most of the time my camera was down in one particular bit of beach
 
there I found so many things to inspire that had a textile "feel" to them ...


looking closely at nature is such a joy


I never imagined I would find all this on a rocky bit of beach!
 
 
(and all the while my house is in sight)
 
this time a week ago I had a brilliant crow day gelli printing with friend Jo
I think you will agree these are quite "grungy" for me!


I also printed with leaves (and feathers)


then ...
on Friday (the 13th) we were back in St. Ives
it was a beautiful bright day ... but very very bitterly cold
 
 
and blustery ...
 
 
 spray was washing right over the pier ... an awesome sight
 
I couldn't quite capture it for having to dodge it!
 
 
but, thankfully, the other side the harbour was sheltered by the pier wall
(love that ladder)

 
  St. Ives was at it's most beautiful ...
I was inspired to stitch ... 
a long sunlit day of swimming
a St. Ives cottage with rock pool details inspired by St. Ives colours
with stitches that match patterns and colours on the mussel shell
 
 
and a little Mousehole rock pool on silk
a sunny rock pool with bright green sea water
it will have gold on it ... reflections of skies and shimmer


with the bluest shells gathered from the beach at Godrevy


the hearts are almost finished ... I have several others I am working on too
but I cannot rush at the moment ... some days I prefer to collage or paint
some days I prefer to gather things and have sketchbook days
some days are wonderful and other days my heart is heavy
(there is a lot going on in my little world that I choose not to mention)
so I shall end here with a happy photo
and send you all lots of love from Cornwall ♥
(thank you so much for visiting me!)
Viewing all 173 articles
Browse latest View live